Friday, July 5, 2013

They're here...Jack & the Hungry Giant Eat Right with MyPlate!

I was rummaging around on Amazon today, and noticed that my new picture book is shipping as of July 1st, so woo hoo! I've only gotten one advance copy thus far, guess the rest of my copies must be on the way. Jack & the Hungry Giant starts out like the traditional fairy tale...Jack gets the beans, they're tossed in the garden, he climbs up the resulting beanstalk and enters the giant's castle. Right away, he runs into a little glitch, or rather, a big furry one!
There may not be a kitty in the original tale, but this orange one demanded to be put into the story. Jack is chased inside a smelly boot, then discovered when the giant arrives home. The giant declares, "I'm hungry!" so the terrified boy makes a dive for it. The giant grabs him by a shoelace, tells him to be careful, and offers to cook him a healthy meal. Waldorf, as it turns out, is a friendly giant and also a wonderful chef.
As they prepare the meal, each spread shows colorful illustrations of the wide variety of foods in the Fruits, Vegetables, Grains, Protein Foods, and Dairy groups. They dish up their plates and enjoy a delicious meal together, along with Waldorf's wife, Zofia. At the end of the book, Waldorf's Tips for Healthy Eating summarizes the MyPlate program and shows many of the foods with empty calories. The last page includes the exercise activities they enjoy in addition to climbing up and down beanstalks.
To look at the book on Amazon, click on this link: Jack and the Hungry Giant Eat Right With MyPlate

Update: During the month of October, the publisher is sponsoring a #giveaway of several copies on Goodreads.

I've posted a FREE activity to go with the book in my TeachersPayTeachers shop. To complete I Can Fill Up My Plate! students will finish writing prompts, make a list of foods in the various groups, then fill up their plate with drawings or cut out photos. Click here to go to my TPT shop and download this resource.
Click cover image to visit my TPT shop
There aren't very many kid-friendly resources to introduce the MyPlate nutrition program, so I hope these will be useful.

Click to visit the Kit Lit blog hop, which has links to over 50 posts about children's books!

Loreen
My web site

Tuesday, July 2, 2013

Making Rainbows

I've spent several days immersed in all the colors of the rainbow...how great is that? Two of my nieces were over here a few days ago and I mentioned that one of my motivations for becoming an artist was to be able to play with color all day long! The reason for the rainbow colors was to make digital frames in variety of shapes and sizes. But why use words when a picture can show so much? Presenting my Radiant Rainbow Frames:
Here's a close-up:
As always, making something new is a learning experience, and some of these had to be redone several times. Anyway, there are 36 Rectangle, Circle, Oval, Curvy, and Star frames in 2 styles (transparent or filled with white) for 72 total. They are for personal or commercial educational use. If you need some eye-catching clip art to make posters, book covers, signs, scrapbook pages, or whatever else, this packet might be perfect! There's a free sample in the Preview in my TPT shop.

Thanks for looking!
Loreen
My web site

Wednesday, June 26, 2013

A Different Kind of Mystery Picture [Part 2]

Part One of this article is here.

The next puzzle is going to be based on one of my favorite math concepts, symmetry. If you're a new reader of this blog, my most recent picture book is called Seeing Symmetry (see a video preview here.) Anyway, I wanted to use shapes with and without line symmetry for the clues. The kids find the symmetrical shapes to solve each clue. The squares (on the left) have the lines that will be drawn in the grid square.
The photo below shows the clues page with some of the symmetrical shapes circled in orange. The grid rows and columns are indicated by different symmetrical shapes. By the way, line symmetry is introduced in grade 4 of the Common Core State Standards (4.G.3), and it's also taught in 3rd grade in many states. Just a few of the squares have been drawn in so far (see below).
 Once all the clues have been solved and the lines drawn in, an owl with outstretched wings should appear.
As you can see, the owl is also symmetrical. Any glitches in the drawing will be obvious and the student can double-check that square again. Once it looks correct, they go over the lines with a black or dark marker. I like the Crayola® brand  SuperTips because they are a good thickness, are washable, and don't have that awful brain-melting smell that certain markers do (yes, Sharpie, I'm talking about you.)
One of the nice aspects of this different kind of mystery picture is that once the drawing is complete, each kiddo can color it with their choice of colors.
It'll be fun to see the whole flock of uniquely colored, symmetrical owls that will fly in, don't you think? Here is the cover and a link to this puzzle:
Click Cover image to visit my TPT shop
Thanks for reading, and let me know if you like this kind of mystery picture…I'm interested in any and all opinions pro or con. Toodleloo!

Loreen
My web site


Tuesday, June 25, 2013

A Different Kind of Mystery Picture [Part 1]

Mystery pictures are used for a variety of educational purposes from learning math facts to sight words to geometric shapes. Typically they are based on a 100s or 120s chart and require students to color in the squares or rectangles according to a list of clues. Very useful, but there are a couple of things that kind of bug me about them. First, the image has numbers or words all over it…which is the point, to familiarize kids with those particular concepts. The other issue for me is that the image is blocky, like an enlargement of pixels on a computer screen.

So I've been playing around with a different approach…instead of numbers or other thingies in the squares, how about labeling the rows and columns? It's a kind of simplified coordinate graph as used in the game Battleship.
To find a particular square's "address," the clues can indicate C4, F8, and so on. The next obstacle is the blocky image. I tried drawing a picture in a grid, similar to an art project where you enlarge an image by drawing what's in each square. But drawing curved and other arbitrary lines seemed too difficult for my purposes. It's a puzzle, not an exercise in duplicating an image, per se.

What about straight lines instead? Here is the same image, sans curves:
And not only are the lines straight, they start and stop at key points in the square, such as the corner, midpoint of an edge, or center point (with a few exceptions.) It's definitely easier to draw. So, each clue reveals the coordinates plus has a little square with one or more lines in it for kids to draw on their blank grid.
Since this approach seemed workable, I went ahead and designed the first puzzle. The clues are based on numbers in expanded form, part of learning about place value. Here's a link to the freebie, "It's a Fluke!" (Get it…whale tail…flukes?) Another advantage is that once the picture is drawn, the kiddos can color it any way they like, so each picture will be different.
There may be similar mystery picture puzzles out there in Internetland…in any case, this type is intriguing to me because of the creative options with the image. It will be interesting to see if teachers find these to be useful and fun for students. "Fluke" has had some positive feedback already, so we shall see!

This article is getting long, so I'll post a part 2 soon. Update: Here is the link to Part 2. Thanks for reading!

Loreen
My website


Sunday, June 2, 2013

Whooo Likes Owls? From Doodle to Designs

Recently I was doodling some ideas for fall writing templates. (Yes, I know the school year is barely over and summer beckons!) This little owl popped up on the page.
There was something intriguing about him. Eventually, it occurred to me that with the out-stretched wings he could make an interesting 3-section graphic organizer. And as an option, the wings could fold in to hide the contents!
Naturally I went bonkers and made a bunch of them. There's a a KWL chart; Sequencing 1-2-3; Beginning-Middle-End; Are-Have-Can; and a Blank Template. They have primary lines, plain lines, or no lines, for 18 designs in all. They can be used for a wide variety of creative projects such as fall and winter writing, fiction and nonfiction about owls, forest animals, predators, food chains, and so on. Here is the cover of Owls Are All Write!:
Click image to visit my TPT store
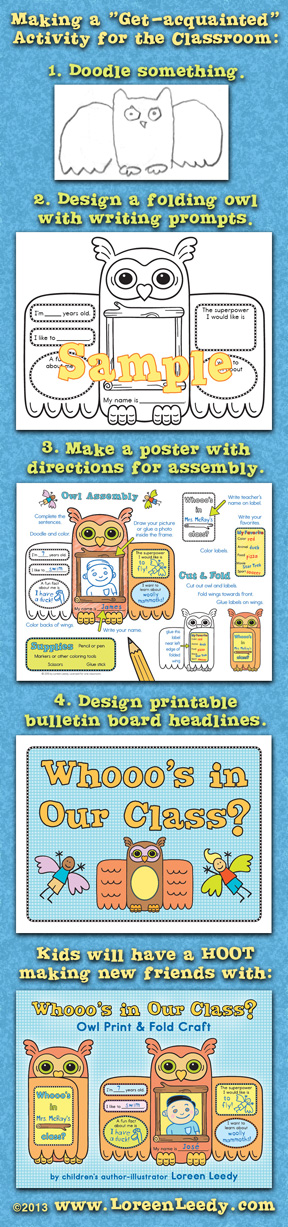
After that was finished, I took my almost-90-year-old mother to visit family and old friends in the northeast. While we were on the road, another idea popped up, this time for a "getting to know you" activity. The long image below gives an idea of what Whooo's in Our Class? is all about:
Kids finish the writing prompts, doodle and color, draw or paste in a photo of themselves, and cut out and fold their owl's wings. Students can browse the finished owls to find out fun facts about each other. It will be great for a back-to-school activity or any occasion when kids are getting to know each other. It's a quick print and go kind of thing, which can certainly help in the hectic beginning days of school. This is my newest classroom resource, and will be discounted for a few days. I mark down all new products as a "thank you" to the wonderful teachers who follow me.

But for now, grab a book, relax in a hammock for awhile, and have a great summer! If your school year isn't over yet, hang in there!

Tuesday, April 9, 2013

Make a Class Book of Similes!

Similes are a type of figurative language, a subset of metaphors to be precise. In other words, all similes are metaphors, but not all metaphors are similes. Many familiar similes have been overused to the point they are considered clichés. We've all heard and/or said, "...as hungry as a bear," for example. But if you're a kid you don't know many familiar sayings. It's kind of a cliché Catch-22...you have to learn them to avoid using them! To help with this conundrum, I've already created a picture book written entirely with similes, plus a free follow-up book extension with real photographs of the items used in the comparisons (see this post for more info).

I just finished a set of 30 printable pages to help children learn similes by drawing pictures of them. First they draw a silly, literal picture, then a picture of the actual meaning. (Or at least, one meaning...many sayings have more than one meaning.) This image shows the steps leading up to a class book.
Click on image to visit my TPT shop.
As the last step shows, kids can use the Blank Template to write and illustrate new, original similes to add to the class book. Or the pages could be used in a bulletin board display of Familiar vs. Original Similes, as one idea. To download the Preview and try a sample page, please visit my shop on TeachersPayTeachers. Also included in the packet is the class book cover in color and black & white.

One group that has trouble with similes and other expressions are students learning English as a second language (ESL, ELL.) I can't imagine trying to make heads or tails of all the idioms we use at the drop of a hat. See what I mean? This activity was a lot of fun to create, and I hope people find it useful. Thanks for reading!

Saturday, March 30, 2013

Learning about Monarch Butterflies by Reading, Writing, and Crafting

I've been intrigued by the possibilities of presenting educational topics in alternate formats other than in books. Not that I have anything against books, obviously! It's just that the digital age we're in opens up the door to so many additional possibilities. My latest classroom resource focuses on one of our most beloved insects, the Monarch butterfly. Several printables are included, such as these in progress below.  Thanks go to my niece Anna for doing the coloring!

Shown is the pre-printed version for lower level students...the alternate version has blank areas for students to write in the facts on the wings as well as the labels on the diagram. There also is a version with the terms Caterpillar/Chrysalis rather than Larva/Pupa. Here is the finished Monarch, with a 3D Life Cycle "dangle" (if that's the right term!)
The back has the Body Parts diagram.
I wanted students to have realistic art to work with so they could create something beautiful to showcase what they have learned. There are several other activities that go along with the craft including an informational text selection, a Life Cycle poster with photographs of the four stages, fact vs. fiction cards, and more. If you'd like, please check out the Preview here.

Hope you're having a wonderful Spring!

Related Posts Plugin for WordPress, Blogger...
Pin It button on image hover